Creating a rendering context
This section describes how to configure a rendering context. For most applications this is handled automatically, but advanced applications can use these options for finer control. OpenGL-family configuration options are covered in detail below.
Displays, screens, configs and contexts

Flow of construction, from the abstract Display to a newly created Window with its Context.
Contexts and configs
When you draw on a window in pyglet, you are drawing to the rendering context
for the active backend. Every window has its own context, created when the
window is created. You can access it via
context.
For OpenGL-family backends, the context is created from a configuration
(or “config”), which describes properties such as color format and buffer
layout. You can access the config used by a window via
config (or window.context.config).
For example, here we create a window using the default config and examine some of its properties:
>>> import pyglet
>>> window = pyglet.window.Window()
>>> context = window.context
>>> config = context.config
>>> config.double_buffer
c_int(1)
>>> config.stereo
c_int(0)
>>> config.sample_buffers
c_int(0)
Note that the values of the config’s attributes are all ctypes instances. This is because the config was not specified by pyglet. Rather, it has been selected by pyglet from a list of configs supported by the system. You can make no guarantee that a given config is valid on a system unless it was provided to you by the system.
pyglet simplifies config selection by allowing you to request only the attributes you care about and letting the window choose a compatible result. See Simple context configuration for details.
Displays
The system may actually support several different sets of configs, depending on which display device is being used. For example, a computer with two video cards may not support the same configs on each card. Another example is using X11 remotely: the display device will support different configurations than the local driver. Even a single video card on the local computer may support different configs for two monitors plugged in.
In pyglet, a Display is a collection of “screens”
attached to a single display device. On Linux, the display device corresponds
to the X11 display being used. On Windows and Mac OS X, there is only one
display (as these operating systems present multiple video cards as a single
virtual device).
The pyglet.display module provides access to the display(s). Use the
get_display() function to get the default display:
>>> display = pyglet.display.get_display()
Note
On X11, you can use the Display class directly to
specify the display string to use, for example to use a remotely connected
display. The name string is in the same format as used by the DISPLAY
environment variable:
>>> display = pyglet.display.Display(name=':1')
If you have multiple physical screens and you’re using Xinerama, see
Screens to select the desired screen as you would for Windows
and Mac OS X. Otherwise, you can specify the screen number via the
x_screen argument:
>>> display = pyglet.display.Display(name=':1', x_screen=1)
Screens
Once you have obtained a display, you can enumerate the screens that are connected. A screen is the physical display medium connected to the display device; for example a computer monitor, TV or projector. Most computers will have a single screen, however dual-head workstations and laptops connected to a projector are common cases where more than one screen will be present.
In the following example the screens of a dual-head workstation are listed:
>>> for screen in display.get_screens():
... print(screen)
...
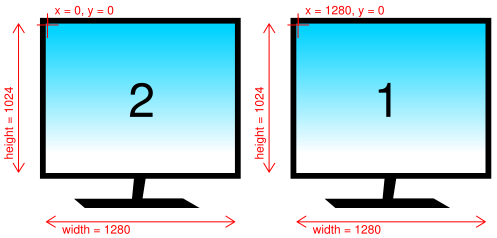
XlibScreen(screen=0, x=1280, y=0, width=1280, height=1024, xinerama=1)
XlibScreen(screen=0, x=0, y=0, width=1280, height=1024, xinerama=1)
Because this workstation is running Linux, the returned screens are
XlibScreen, a subclass of Screen. The
screen and xinerama attributes are specific to Linux, but the
x, y,
width and
height attributes are present on all screens,
and describe the screen’s geometry, as shown below.
Example arrangement of screens and their reported geometry. Note that the primary display (marked “1”) is positioned on the right, according to this particular user’s preference.
There is always a “default” screen, which is the first screen returned by
get_screens(). Depending on the operating system,
the default screen is usually the one that contains the taskbar (on Windows) or
menu bar (on OS X).
You can access this screen directly using
get_default_screen().
OpenGL configuration options
When configuring or selecting an OpenGL config, you do so based on the
properties of pyglet.config.Config.opengl (or .gl2/.gles2/.gles3).
pyglet supports a fixed subset of the
options provided by AGL, GLX, WGL and their extensions. In particular, these
constraints are placed on all OpenGL configs:
Buffers are always component (RGB or RGBA) color, never palette indexed.
The “level” of a buffer is always 0 (this parameter is largely unsupported by modern OpenGL drivers anyway).
There is no way to set the transparent color of a buffer (again, this GLX-specific option is not well supported).
There is no support for pbuffers (equivalent functionality can be achieved much more simply and efficiently using framebuffer objects).
The visible portion of the buffer, sometimes called the color buffer, is configured with the following attributes:
buffer_sizeNumber of bits per sample. Common values are 24 and 32, which each dedicate 8 bits per color component. A buffer size of 16 is also possible, which usually corresponds to 5, 6, and 5 bits of red, green and blue, respectively.
Usually there is no need to set this property, as the device driver will select a buffer size compatible with the current display mode by default.
red_size,blue_size,green_size,alpha_sizeThese each give the number of bits dedicated to their respective color component. You should avoid setting any of the red, green or blue sizes, as these are determined by the driver based on the
buffer_sizeproperty.If you require an alpha channel in your color buffer (for example, if you are compositing in multiple passes) you should specify
alpha_size=8to ensure that this channel is created.sample_buffersandsamplesConfigures the buffer for multisampling (MSAA), in which more than one color sample is used to determine the color of each pixel, leading to a higher quality, antialiased image.
Enable multisampling (MSAA) by setting
sample_buffers=1, then give the number of samples per pixel to use insamples. For example,samples=2is the fastest, lowest-quality multisample configuration.samples=4is still widely supported and fairly performant even on Intel HD and AMD Vega. Most modern GPUs support 2×, 4×, 8×, and 16× MSAA samples with fairly high performance.stereoCreates separate left and right buffers, for use with stereo hardware. Only specialised video hardware such as stereoscopic glasses will support this option. When used, you will need to manually render to each buffer, for example using glDrawBuffers.
double_bufferCreate separate front and back buffers. Without double-buffering, drawing commands are immediately visible on the screen, and the user will notice a visible flicker as the image is redrawn in front of them.
It is recommended to set
double_buffer=True, which creates a separate hidden buffer to which drawing is performed. When the Window.flip is called, the buffers are swapped, making the new drawing visible virtually instantaneously.
In addition to the color buffer, several other buffers can optionally be created based on the values of these properties:
depth_sizeA depth buffer is usually required for 3D rendering. The typical depth size is 24 bits. Specify
0if you do not require a depth buffer.stencil_sizeThe stencil buffer is required for masking the other buffers and implementing certain volumetric shadowing algorithms. The typical stencil size is 8 bits; or specify
0if you do not require it.accum_red_size,accum_blue_size,accum_green_size,accum_alpha_sizeThe accumulation buffer can be used for simple antialiasing, depth-of-field, motion blur and other compositing operations. Its use nowadays is being superseded by the use of floating-point textures, however it is still a practical solution for implementing these effects on older hardware.
If you require an accumulation buffer, specify
8for each of these attributes (the alpha component is optional, of course).aux_buffersEach auxiliary buffer is configured the same as the colour buffer. Up to four auxiliary buffers can typically be created. Specify
0if you do not require any auxiliary buffers.Like the accumulation buffer, auxiliary buffers are used less often nowadays as more efficient techniques such as render-to-texture are available. They are almost universally available on older hardware, though, where the newer techniques are not possible.
If you wish to work with OpenGL directly, you can request a higher level context. This is required if you wish to work with the modern OpenGL programmable pipeline. Please note, however, that pyglet currently uses legacy OpenGL functionality for many of its internal modules (such as the text, graphics, and sprite modules). Requesting a higher version context will currently prevent usage of these modules.
major_versionThis will be either 3 or 4, for an OpenGL 3.x or 4.x context.
minor_versionThe requested minor version of the context. In some cases, the OpenGL driver may return a higher version than requested.
forward_compatibleSetting this to True will ask the driver to exclude legacy OpenGL features from the context. Khronos does not recommend this option.
Note
On macOS, requesting higher OpenGL versions can be more restrictive than on other platforms and may depend on driver and platform constraints.
The default configuration
If you create a Window without specifying the context
or config, pyglet will use a default backend config with the following properties:
Attribute
Value
double_buffer
True
depth_size
24
Simple context configuration
A context can only be created from a config that was provided by the system. Enumerating and comparing all possible configs is platform-specific, so pyglet provides a simpler interface based on user configuration objects.
To request specific attributes, construct Config,
set values on the backend-specific entry (such as config.opengl), and pass
it to Window.
For example, to create a window with an alpha channel:
config = pyglet.config.Config()
config.opengl.alpha_size = 8
window = pyglet.window.Window(config=config)
You can predefine settings for multiple backends in the same object:
config = pyglet.config.Config()
config.opengl.major_version = 4
config.opengl.minor_version = 1
config.gl2.double_buffer = True
window = pyglet.window.Window(config=config)
Not all requested configs will be possible on all machines. Window creation
raises
NoSuchConfigException if the hardware does not
support the requested attributes.
You can use this to support newer hardware features where available, but also accept a lesser config if necessary. For example, the following code creates a window with multisampling if possible, otherwise leaves multisampling off:
multisample = pyglet.config.Config()
multisample.opengl.sample_buffers = 1
multisample.opengl.samples = 4

fallback = pyglet.config.Config()
fallback.opengl.depth_size = 24

window = pyglet.window.Window(config=[multisample, fallback])
Selecting config priority
Passing an iterable of Config lets you define a
priority order. pyglet tries each config in order and uses the first one that
can be matched by the active backend.